RVB2601应用开发实战系列一: Helloworld最小系统
[复制链接]
关键词:RVB2601、RISC-V开发板、例程,低功耗,玄铁E906,RISC-V MCU,上手,好用,控制,WiFi&BLE
1. 引言
RVB2601开发板是基于CH2601芯片设计的生态开发板,其具有丰富的外设功能和联网功能,可以开发设计出很多有趣的应用。为了开发者更好的了解如何在CH2601上开发应用,本文介绍了如何移植对接CH2601芯片到YoC最小系统,开发第一个我的helloworld程序。
整个开发移植工作,我们都全部基于剑池CDK集成开发环境进行开发。剑池CDK以极简开发为理念,是专业为IoT应用开发打造的集成开发环境。它在不改变用户开发习惯的基础上,全面接入云端开发资源,结合 图形化的OSTracer、Profiling等调试分析工具,加速用户产品开发。想要了解更多剑池CDK开发信息,请前往平头哥芯片开发社区里集成开发环境获取更多。
建议在在看本文之前,先详细看下RVB2601开发板快速上手教程。本例程名为ch2601_helloworld_demo,可以通过CDK直接从OCC拉取。
2. 最小系统移植适配
YoC最小系统包括对AliOS Things内核的移植,涉及到任务切换时的处理器上下文保存和恢复 ,中断事件处理,时钟心跳初始化等。利用一个任务不断周期性的打印"Helloworld"来演示最小系统移植成功。
2.1 适配YoC 内核
进入ch2601_helloworld目录,打开工程文件,所有的组件代码都位于packages节点下, 点击packages下的 rhino_arch 包。该组件包含了ARM、CSKY、RISCV等架构下的任务调度的代码,假如架构相同,则直接使用包内代码,若不存在,需要按照接口,将port_s.S、port_c.c等代码实现。具体目录结构如下图:
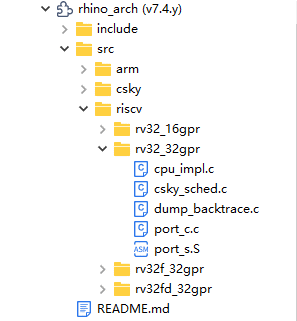
由于CH2601使用了RISC-V 32bit处理器, 我们使用rv32_32gpr的具体实现,根据Kernel的对接分为以下几个部分:
2.1.1 任务切换相关
该功能函数定义在rhino_arch/src/riscv/rv32_32gpr/port_c.S里, 主要用户触发软中断,切换任务。用户可以通过该接口来实现任务切换。
- cpu_intrpt_switch:
- li t0, 0xE080100C
- lb t1, (t0)
- li t2, 0x01
- or t1, t1, t2
- sb t1, (t0)
-
- ret
该功能函数定义在rhino_arch/src/riscv/rv32_32gpr/port_c.S里, 作为tspend中断的处理函数接口,主要用于保存当前的任务上下文,切换将要运行的下一个任务后,恢复下一个任务上下文。
- tspend_handler:
- addi sp, sp, -124
-
- sw x1, 0(sp)
- sw x3, 4(sp)
- sw x4, 8(sp)
- sw x5, 12(sp)
- sw x6, 16(sp)
- sw x7, 20(sp)
- sw x8, 24(sp)
- sw x9, 28(sp)
- sw x10, 32(sp)
- sw x11, 36(sp)
- sw x12, 40(sp)
- sw x13, 44(sp)
- sw x14, 48(sp)
- sw x15, 52(sp)
- sw x16, 56(sp)
- sw x17, 60(sp)
- sw x18, 64(sp)
- sw x19, 68(sp)
- sw x20, 72(sp)
- sw x21, 76(sp)
- sw x22, 80(sp)
- sw x23, 84(sp)
- sw x24, 88(sp)
- sw x25, 92(sp)
- sw x26, 96(sp)
- sw x27, 100(sp)
- sw x28, 104(sp)
- sw x29, 108(sp)
- sw x30, 112(sp)
- sw x31, 116(sp)
- csrr t0, mepc
- sw t0, 120(sp)
-
- la a1, g_active_task
- lw a1, (a1)
- sw sp, (a1)
-
- li t0, 0xE000E100
- lw t1, (t0)
- li t2, 0xFEFFFFFF
- and t1, t1, t2
- sw t1, (t0)
-
- __task_switch_nosave:
- la a0, g_preferred_ready_task
- la a1, g_active_task
- lw a2, (a0)
- sw a2, (a1)
-
- lw sp, (a2)
-
-
- li t0, MSTATUS_PRV1
- csrs mstatus, t0
-
- lw t0, 120(sp)
- csrw mepc, t0
-
- lw x1, 0(sp)
- lw x3, 4(sp)
- lw x4, 8(sp)
- lw x5, 12(sp)
- lw x6, 16(sp)
- lw x7, 20(sp)
- lw x8, 24(sp)
- lw x9, 28(sp)
- lw x10, 32(sp)
- lw x11, 36(sp)
- lw x12, 40(sp)
- lw x13, 44(sp)
- lw x14, 48(sp)
- lw x15, 52(sp)
- lw x16, 56(sp)
- lw x17, 60(sp)
- lw x18, 64(sp)
- lw x19, 68(sp)
- lw x20, 72(sp)
- lw x21, 76(sp)
- lw x22, 80(sp)
- lw x23, 84(sp)
- lw x24, 88(sp)
- lw x25, 92(sp)
- lw x26, 96(sp)
- lw x27, 100(sp)
- lw x28, 104(sp)
- lw x29, 108(sp)
- lw x30, 112(sp)
- lw x31, 116(sp)
-
- addi sp, sp, 124
- mret
2.1.2 第一个任务初始化
该功能函数定义在rhino_arch/src/riscv/rv32_32gpr/port_c.S里, 作为第一个任务启动接口。用户通过调用该接口来实现第一个任务的启动。
- cpu_first_task_start:
- j __task_switch_nosave
该功能函数定义在rhino_arch/src/riscv/rv32_32gpr/port_c.c里, 用于初始化第一个任务的的上下文,用户可以通过调用该接口来实现第一个任务的执行入口,输入参数等。
- void *cpu_task_stack_init(cpu_stack_t *stack_base, size_t stack_size,
- void *arg, task_entry_t entry)
- {
- cpu_stack_t *stk;
- register int *gp asm("x3");
- uint32_t temp = (uint32_t)(stack_base + stack_size);
-
- temp &= 0xFFFFFFF8UL;
-
- stk = (cpu_stack_t *)temp;
-
- *(--stk) = (uint32_t)entry;
- *(--stk) = (uint32_t)0x31313131L;
- *(--stk) = (uint32_t)0x30303030L;
- *(--stk) = (uint32_t)0x29292929L;
- *(--stk) = (uint32_t)0x28282828L;
- *(--stk) = (uint32_t)0x27272727L;
- *(--stk) = (uint32_t)0x26262626L;
- *(--stk) = (uint32_t)0x25252525L;
- *(--stk) = (uint32_t)0x24242424L;
- *(--stk) = (uint32_t)0x23232323L;
- *(--stk) = (uint32_t)0x22222222L;
- *(--stk) = (uint32_t)0x21212121L;
- *(--stk) = (uint32_t)0x20202020L;
- *(--stk) = (uint32_t)0x19191919L;
- *(--stk) = (uint32_t)0x18181818L;
- *(--stk) = (uint32_t)0x17171717L;
- *(--stk) = (uint32_t)0x16161616L;
- *(--stk) = (uint32_t)0x15151515L;
- *(--stk) = (uint32_t)0x14141414L;
- *(--stk) = (uint32_t)0x13131313L;
- *(--stk) = (uint32_t)0x12121212L;
- *(--stk) = (uint32_t)0x11111111L;
- *(--stk) = (uint32_t)arg;
- *(--stk) = (uint32_t)0x09090909L;
- *(--stk) = (uint32_t)0x08080808L;
- *(--stk) = (uint32_t)0x07070707L;
- *(--stk) = (uint32_t)0x06060606L;
- *(--stk) = (uint32_t)0x05050505L;
- *(--stk) = (uint32_t)0x04040404L;
- *(--stk) = (uint32_t)gp;
- *(--stk) = (uint32_t)krhino_task_deathbed;
-
- return stk;
- }
2.1.3 内核心跳时钟初始化
内核心跳时钟主要用于系统时钟的计时,系统任务的切换等。我们可以采用一个普通的定时器来做为系统心跳时钟。
该功能函数定义在chip_ch2601/sys/system.c, 实现对整个系统的进行初始化,包括对系统内核时钟,CACHE初始化等。
- void SystemInit(void)
- {
- enable_theadisaee();
-
- cache_init();
-
- section_init();
-
- interrupt_init();
-
- soc_set_sys_freq(CPU_196_608MHZ);
-
- csi_etb_init();
-
- sys_dma_init();
-
- csi_tick_init();
-
- #ifdef CONFIG_XIP
- sys_spiflash_init();
- #endif
- bootrom_uart_uninit();
- }
该功能函数在chip_ch2601/sys/tick.c,实现内核心跳的初始化,通过回调函数tick_event_cb 对系统时钟进行技术,同时通过调用krhino_tick_proc实现对系统任务的调度。
- csi_error_t csi_tick_init(void)
- {
- csi_error_t ret;
-
- csi_tick = 0U;
- ret = csi_timer_init(&tick_timer, CONFIG_TICK_TIMER_IDX);
-
- if (ret == CSI_OK) {
- ret = csi_timer_attach_callback(&tick_timer, tick_event_cb, NULL);
-
- if (ret == CSI_OK) {
- ret = csi_timer_start(&tick_timer, (1000000U / CONFIG_SYSTICK_HZ));
- }
- }
-
- return ret;
- }
-
- void csi_tick_increase(void)
- {
- csi_tick++;
- }
-
- static void tick_event_cb(csi_timer_t *timer_handle, void *arg)
- {
- csi_tick_increase();
- #if defined(CONFIG_KERNEL_RHINO)
- krhino_tick_proc();
- #elif defined(CONFIG_KERNEL_FREERTOS)
- xPortSysTickHandler();
- #elif defined(CONFIG_KERNEL_UCOS)
- OSTimeTick();
- #endif
- }
2.1.4 内核初始化
在任务启动前,需要对内核做初始化,最后调用aos_start来启动第一个任务。
该功能函数位于aos/src/main.c, 用于初始化内核,启动第一个任务。
- int pre_main(void)
-
- {
-
- aos_init();
- #ifdef CONFIG_OS_TRACE
- trace_init_data();
- #endif
-
-
- aos_task_new_ext(&app_task_handle, "app_task", application_task_entry,
- NULL, INIT_TASK_STACK_SIZE, AOS_DEFAULT_APP_PRI);
-
-
- aos_start();
-
- return 0;
- }
该功能函数用于启动内核,运行第一个任务。
至此,YoC内核部分适配结束,编译通过后就可以进行Helloworld应用程序开发了。
2.2 开发helloworld程序
2.2.1 串口初始化
在app/src/init/init.c里完成board初始化函数里完成串口的初始化。
- void board_yoc_init()
- {
- board_init();
-
- console_init(CONSOLE_UART_IDX, 115200, 128);
-
- ulog_init();
- aos_set_log_level(AOS_LL_DEBUG);
-
- LOGI(TAG, "Build:%s,%s",__DATE__, __TIME__);
- board_cli_init();
- }
该功能函数用于串口的初始化。
该功能函数用于打印功能的初始化。
2.2.2 打印Helloworld
最后在main函数里实现helloworld的循环打印。
- int main(void)
- {
- board_yoc_init();
- LOGD(TAG, "%s\n", aos_get_app_version());
-
- while (1) {
- LOGD(TAG, "Hello world! YoC");
- sample_test();
- aos_msleep(1000);
- }
-
- return 0;
- }
2.3. 编译运行
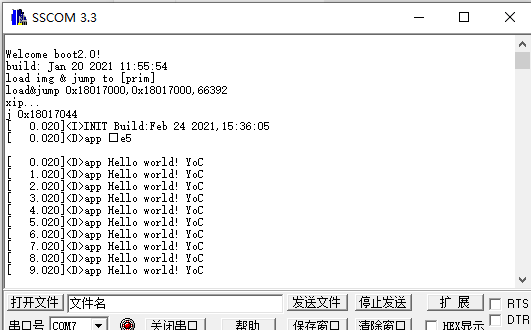
编译通过后,下载到RVB2601开发板后复位运行(具体下载运行操作可以参考RVB2601开发板快速上手教程),看到串口窗口出现一下打印,说明移植成功。
3. 总结
RVB2601最小系统hellworld主要实现对YoC系统的内核适配,具备RTOS的基本能力,实现简单的串口打印。后续还有更精彩的实战案例,敬请期待。
本文转自平头哥芯片开放社区(occ),更多详情请点击【这里】。
| 
 提升卡
提升卡 变色卡
变色卡 千斤顶
千斤顶
 1/10
1/10 


 京公网安备 11010802033920号
Copyright © 2005-2025 EEWORLD.com.cn, Inc. All rights reserved
京公网安备 11010802033920号
Copyright © 2005-2025 EEWORLD.com.cn, Inc. All rights reserved
